
(Re)Aprendendo crochê circular
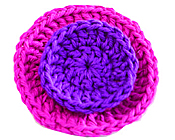
Depois de muito penar tentando fazer bichinhos de crochê, descobri o que eu fazia errado. Minha idéia de crochê em círculo estava um pouco errada. Quer dizer, os meus resultados finais ficavam até que legais, mas não podiam ser chamados de círculos; estavam mais para caracóis. Claro que, dependendo do projeto, esse tipo de coisa cai bem, mas nos amigurumis da vida isso não estava dando certo.

Felizmente pra mim, o site da Adorn Magazine tem uma seção pra lá de legal de dicas que deixou beeeem claro o que eu andava fazendo de errado; o problema era que eu não havia entendido como crochetar em círculo. Com os gráficos e explicações deles, entendi direitinho e não vejo a hora de chegar em casa para colocar tudo em prática.
Para ajudar qualquer pessoa que queira se aventurar no mundo do crochê circular, estou colocando as imagens e as instruções (em inglês) aqui. Tudo foi retirado do site da revista Adorn Magazine, o www.adornmag.com. Lá vocês podem encontrar outras dicas e conferir o que tem na edição atual. Só não descobri ainda se dá pra comprar ou fazer assinatura direto daqui do Brasil. Enfim, have a blast, peeps!
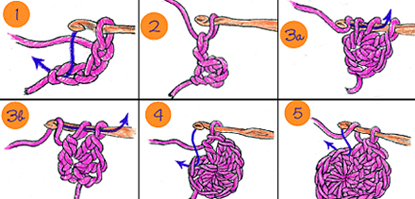
HOW TO:
1. Start with a foundation ring. Make a slipknot on the end of the yarn and chain four. To make each chain stitch, slip hook through slipknot (or previous stitch), wrap yarn over the hook, and pull through.
2. To join: insert yarn into the slipknot you made. You now have two loops on the hook. Wrap yarn over hook and pull through both loops. This is called a slip stitch. To get started on your first round, chain two (to account for the height of the double crochet stitch). You will do this at the end of each round.
3. Make ten double crochet stitches for the first round. To make a double crochet stitch, wrap yarn over hook, place hook through center ring, wrap around hook again. (fig. 3a). Pull yarn through first two loops on hook. Now you have two loops on your hook. Wrap yarn over hook (without inserting it into the stitch this time) and pull through both loops. (fig. 3b). This counts as one double crochet stitch, make ten total.
4. Once you have made ten double crochet stitches into the center ring, join last stitch to the first stitch as shown by the arrow (fig. 4).
5. Chain two and begin your next round. Make two double crochet stitches in each stitch from the previous round (this is called an increase). Now it’s time for a little math. The basic premise for crocheting in the round is to add the number of stitches you started with (in this case, 10) to each round. So for the second round, you’ll make 20 stitches, meaning an increase in every stitch. For the third round, you’ll add 10 again, for a total of 30 stitches. This means you’ll add an increase to every other stitch. To figure out where to place the increases on each round, simply subtract 1 from the round number. For example, on the fourth round you’ll increase every third stitch, on the fifth, increase every fourth stitch. Continue making rounds this way until circle reaches desired size. Consult table for number of rounds needed in each project.
![]()
2 comentários:
isso tudo é muito complexo!
bom comeco
Postar um comentário